 配置&容器&注册、注入组件
# 配置 & 容器 & 注册、注入组件
# 面向对象中应对变化的方案 🔥
# 策略模式 🔥
制定一个 Interface,用多个类实现该 Interface
常规配置:key: value;XML 配置:类/对象
- @Autowired 的 byName 切换 Bean(不推荐)
- @Qualifier 制定 name 的 Bean(可以,也不推荐,因为是主动注入,依赖的应该无需关系具体实现!由被依赖方决定)
- 有选择的只注入一个 Bean(其他注释掉)
@Primary首先注入,推荐@Conditional等,推荐@Profile
# 可配置属性 🔥
一个类,使用属性(可读取配置)来解决变化。如 JDBC 的 url 等。相比第一个方法不灵活(只能修改配置,不能修改类,当要增删属性时就必须修改类了),当然可以实现一个 Interface 来综合使用。
- 配置文件集中性
- 清晰,没有业务逻辑
根据需要选择上述两种方案,一般可以综合使用!
# @Configuration 配置类 🔥
# @Configuration 及其作用 🔥
用于指定当前类是一个 Spring 配置类,其底层还是@Componet,当创建容器时会从该类上加载注解。当配置类作为 AnnotationConfigApplicationContext 构造器的参数时,该注解可以不写(不推荐)
value用于指定配置类的字节码,一般不用
作用:保持代码的相对稳定,才能逐步实现 OCP。但是代码中总会存在不稳定,需要隔离这些不稳定因素(采用配置类、配置文件等方式),保证其他的代码是稳定的。即对象的实例化应该和其他分开!
- 配置文件的集中性
- 配置文件清晰(但是多了后也不清晰),没有业务逻辑
# 常用方式—配置类 + 配置文件 🔥
可配置属性方式解决面向对象中变化
# @Value
用于注入基本类型和String数据
value指定数据的值。- 基本类型和String
- 使用SpEL(写法:
#{表达式}) ${}结合@PropertySource可取出配置文件如 properties 或 yml 中的值(也存在于运行环境变量里面)
@RestController
public class HelloController {

    @Value("${dog[0].name}")//数组或集合中保存对象
    private String name;

    @RequestMapping("/hello")
    public String hello(){
        return "hello spring boot "+name;
    }
}
2
3
4
5
6
7
8
9
10
11
12
# @PropertySource
重复注解,用于指定properties文件的位置
value指定文件的名称和路径数组。关键字:classpath,表示类路径下
/**
 * 将配置文件中配置的每一个属性的值,映射到这个组件中
 * @ConfigurationProperties:告诉SpringBoot将本类中的所有属性和配置文件中相关的配置进行绑定;
 *      prefix = "person":配置文件中哪个下面的所有属性进行一一映射
 *
 * 只有这个组件是容器中的组件,才能容器提供的@ConfigurationProperties功能;
 */
@PropertySource(value = {"classpath:person.properties"})
@Component
@ConfigurationProperties(prefix = "person")
public class Person {

    private String lastName;
    private Integer age;
    private Boolean boss;
2
3
4
5
6
7
8
9
10
11
12
13
14
15
16
# @ConfigurationProperties
Spring Boot 特有,用于批量注入配置文件中的属性,可配合 @PropertySource 使用
通过注解 @ConfigurationProperties(prefix="配置文件中的key的前缀") 可以将配置文件中的配置自动与实体进行映射,需要提供 setter 方法
@Component
@RestController
@ConfigurationProperties(prefix = "teacher")
public class HelloController {

    private String name;

    public String getName() {
        return name;
    }

    public void setName(String name) {
        this.name = name;
    }

    @RequestMapping("/hello")
    public String hello(){
        return "hello spring boot "+name;
    }
}
2
3
4
5
6
7
8
9
10
11
12
13
14
15
16
17
18
19
20
21
@ConfigurationProperties报错 Not registered via @EnableConfigurationProperties or marked as Spring component,添加了@Component注解后解决了
若出现以下提示,需要配置文件执行器,并在类中定义好属性和 set 方法后,如果在配置文件中编写配置会有提示!
<!--配置文件执行器配置-->
<dependency>
    <groupId>org.springframework.boot</groupId>
    <artifactId>spring-boot-configuration-processor</artifactId>
    <optional>true</optional>
</dependency>
2
3
4
5
6
7
@Value 和 @ConfigurationProperties 比较
| @ConfigurationProperties | @Value | |
|---|---|---|
| 功能 | 批量注入配置文件中的属性 | 一个个指定 |
| 松散绑定(松散语法) | 支持 | 不支持 |
| SpEL | 不支持 | 支持 |
| JSR303 数据校验 | 支持 | 不支持 |
| 复杂类型封装 | 支持 | 不支持 |
松散语法绑定:last_name = last-name = lastName 他们取的值都是相同的
配置文件 yml 还是 properties 他们都能获取到值,怎么选择呢?
- 若我们只是在某个业务逻辑中需要获取一下配置文件中的某项值,使用@Value;
- 若我们专门编写了一个 javaBean 来和配置文件映射,我们就直接使用@ConfigurationProperties
# 示例
application.yml
person.nickName: wangcai
Person.Class
@Data
public class Person {

    @Value("张三")
    private String name;

    /**
     * SpEL
     */
    @Value("#{20-2}")
    private Long age;

    /**
     * 使用 @PropertySource 配合 ${} 获取配置文件中的值(也存在于运行环境变量 Environment 中)
     */
    @Value("${person.nickName}")
    private String nickName;
}
2
3
4
5
6
7
8
9
10
11
12
13
14
15
16
17
18
AssignmentConfig1.Class
@Configuration
@PropertySource({"classpath:/application.yml"})
public class AssignmentConfig1 {

    @Bean
    public Person person(){
        return new Person();
    }

}
2
3
4
5
6
7
8
9
10
AssignmentConfig1Test.Class
public class AssignmentConfig1Test {

    private ApplicationContext context;

    @BeforeEach
    public void init(){
        context = new AnnotationConfigApplicationContext(AssignmentConfig1.class);
        System.out.println("容器创建完成");
    }


    @Test
    public void test(){

        Person person = context.getBean(Person.class);
        System.out.println(person);

        Environment environment = context.getEnvironment();
        String nickName = environment.getProperty("person.nickName");
        System.out.println(nickName);

    }
}
2
3
4
5
6
7
8
9
10
11
12
13
14
15
16
17
18
19
20
21
22
23
若是配置数据库连接,可以采用该方式来解耦 ip、port 等变化!就是使用该思想!
# @Configuration 和 @Bean
@ImportResource:导入 Spring 的配置文件,如 beans.xml,加载 bean,让配置文件里面的内容生效
Spring Boot 里面没有 Spring 的配置文件,我们自己编写的配置文件,也不能自动识别;
想让 Spring 的配置文件生效,加载进来;@ImportResource 标注在一个配置类上
<bean id="helloService" class="com.cuzz.springboot.service.HelloService"></bean>1@ImportResource(locations = {"classpath:beans.xml"}) @SpringBootApplication public class SpringbootApplication { public static void main(String[] args) { SpringApplication.run(SpringbootApplication.class, args); } }1
2
3
4
5
6
7
8
9还是写配置类吧!利用@Configuration 和@Bean
@Configuration
public class MyAppConfig {
    // 将方法的返回值添加到容器中;容器中这个组件默认的id就是方法名
    @Bean
    public HelloService helloService02(){
        System.out.println("配置类@Bean给容器中添加组件了...");
        return new HelloService();
    }
}
1
2
3
4
5
6
7
8
9
10
# 测试步骤
Maven 依赖
<dependencies>
    <!--context 默认传递依赖 core、beans、expression、aop 等-->
    <dependency>
        <groupId>org.springframework</groupId>
        <artifactId>spring-context</artifactId>
        <version>5.2.6.RELEASE</version>
    </dependency>

    <dependency>
        <groupId>org.projectlombok</groupId>
        <artifactId>lombok</artifactId>
        <version>1.18.12</version>
    </dependency>

	<!-- junit5 使用查看 Github 示例 -->
    <!-- https://mvnrepository.com/artifact/org.junit.jupiter/junit-jupiter-api -->
    <dependency>
        <groupId>org.junit.jupiter</groupId>
        <artifactId>junit-jupiter</artifactId>
        <version>5.6.2</version>
        <scope>test</scope>
    </dependency>
</dependencies>
1
2
3
4
5
6
7
8
9
10
11
12
13
14
15
16
17
18
19
20
21
22
23此时使用 Maven 来编译会警告 Java 版本,可以在 POM.mxl 中添加如下配置(Spring Boot 就是添加的这种)。
可查看 Maven 文档配置
<properties>
    <java.version>1.8</java.version>
    <maven.compiler.source>${java.version}</maven.compiler.source>
    <maven.compiler.target>${java.version}</maven.compiler.target>
    <project.reporting.outputEncoding>UTF-8</project.reporting.outputEncoding>
    <project.build.sourceEncoding>UTF-8</project.build.sourceEncoding>
    <resource.delimiter>@</resource.delimiter>
</properties>
1
2
3
4
5
6
7
8POJO
@Data
@NoArgsConstructor
@AllArgsConstructor
public class Person {

    private String name;
    private Integer age;

}
1
2
3
4
5
6
7
8
9配置类
// 配置类==配置文件
@Configuration// //告诉Spring这是一个配置类。该类为 容器构造器参数时,可省略该注解(不推荐)
// 每次测试时记得将其他 @Configuration 注释掉,或着注释掉 @ComponentScan
public class IocConfig1 {

    @Bean
    public Person person(){
        return new Person("person",1);
    }

    @Bean
    @Primary
    public Person person2(){
        return new Person("person2",2);
    }

}
1
2
3
4
5
6
7
8
9
10
11
12
13
14
15
16
17测试类
public class IocConfig1Test {


    @Test
    public void test(){
        ApplicationContext context = new AnnotationConfigApplicationContext(IocConfig1.class);

        // 根据 bean 名称获取。有多个时取第一个(使用@Primary也没用,暂时就这样)
        Person person1 = (Person) context.getBean("person");
        System.out.println(person1);

        // 根据 bean 类型(包括子类、实现类)获取。
        // 只要容器中有唯一一个 Bean 对象类型和要注入的变量类型匹配,就注入成功,一个都没有则报错
        // 如果有多个类型匹配到,则报错。可以使用 @Primary 来指定
        Person person2 = context.getBean(Person.class);
        System.out.println(person2);

        // 根据 bean 名称和类型获取
        Person person3 = context.getBean("person", Person.class);
        System.out.println(person3);

        // 获取所有该类型的 bean
        Map<String, Person> beansOfType = context.getBeansOfType(Person.class);
        beansOfType.forEach((name,person)->{
            System.out.println(name+":"+person);
        });

        // 获取所有该类型的 bean 名称
        String[] beanNamesForType = context.getBeanNamesForType(Person.class);
        System.out.println(Arrays.toString(beanNamesForType));


        // 获取容器中所有 bean 名称
        String[] beanDefinitionNames = context.getBeanDefinitionNames();
        System.out.println(Arrays.toString(beanDefinitionNames));

    }
}
1
2
3
4
5
6
7
8
9
10
11
12
13
14
15
16
17
18
19
20
21
22
23
24
25
26
27
28
29
30
31
32
33
34
35
36
37
38
# 容器接口及其实现类
# 接口及实现类
BeanFactory顶层容器接口。创建对象采用延迟加载方式(何时使用何时创建,多例适用)ApplicationContext容器接口。创建对象采用立即加载方式(读完配置文件,默认情况下就创建(可修改),单例适用)ClassPathXmlApplicationContext,基于xml配置的实现类。只能加载类路径下的配置文件FileSystemXmlApplicationContext,基于xml配置的实现类。可以加载磁盘任意路径的配置文件(需有访问权限)AnnotationConfigApplicationContext,基于注解配置的实现类。读取注解创建容器
# 常用方法
提示
获取容器时使用 AnnotationConfigApplicationContext(有@Configuration 注解的类.class)来创建ApplicationContext对象。由于本身也是@Component,所以指定@ComponentScan时可以跳过此类(了解)
String[] getBeanDefinitionNames():查询这个IoC容器中所有Bean的名称String[] getBeanNamesForType(Class c):查询这个IoC容器中指定类型的Bean的名称Map<String, Class >getBeansOfType(Class c):查询这个IoC容器中所有Bean的名称、和Bean对象Object getBean([String beanName] [,Class c])
# 注册组件—包扫描 & 注解🔥
提示
适用于自己写的类
# @ComponentScans
用于多个@ComponentScan。属性有value数组,可以包含多个@ComponentScan。Java 8 后使用下面的
# @ComponentScan 🔥
在JDK8之后是重复注解,直接写多个,不再使用上边那个
扫描规则:
- 指定 value 或 bashPackages 即Spring在初始化容器时要扫描的包,将扫描(不一定就注入容器)该包及其子包下的所有类,然后根据规则排除
- 不指定则扫描配置类所在包及其子包下的所有类,然后根据规则排除。
- 默认包括 @Componet 及其派生类,如 @Componet、@Controller、@Service、@Repository、@Configuration 等
属性:
value或basePackages都是用于指定要扫描的包,都是数组类型excludeFilters指定扫描的时候按照什么规则排除那些组件includeFilters指定扫描的时候只需要包含哪些组件值为
Filter[],使用@Filter注解,属性有type(如下)、classes(Class类型)FilterType.ANNOTATION:按照带有的注解类型FilterType.ASSIGNABLE_TYPE:按照给定的具体类型FilterType.ASPECTJ:使用ASPECTJ表达式FilterType.REGEX:使用正则指定FilterType.CUSTOM:使用自定义规则,需要自定义TypeFilter的实现类,重写match方法
useDefaultFilters在使用指定的规则时需要将这个值设置为false。默认为true- 若该值为
true,则扫描该五个注解并匹配上述规则。一般不会这样做(很傻逼) - 若该值为
false,则仅需匹配上述规则
- 若该值为
::: 注意
@Componet注解是上述四个注解的底层实现,若exclude后则四个注解都不会扫描到includeFilters和excludeFilters会共同作用,必须都满足(且以excludeFilters为准)- 上述扫描的类型指的都是该类及其子类,该注解及其子注解
:::
# 自定义 FilterType 🔥
/**
 * 自定义 TypeFilter
 */
public class MyTypeFilter implements TypeFilter {
    /**
     *
     * @param metadataReader 读取到的当前正在扫描的类的信息
     * @param metadataReaderFactory 可以获取到其他任何类信息的
     * @return boolean
     * @throws IOException
     */
    @Override
    public boolean match(MetadataReader metadataReader, MetadataReaderFactory metadataReaderFactory) throws IOException {
        //获取当前类注解的信息
        AnnotationMetadata annotationMetadata = metadataReader.getAnnotationMetadata();
        //获取当前正在扫描的类的类信息
        ClassMetadata classMetadata = metadataReader.getClassMetadata();
        //获取当前类资源(类的路径)
        Resource resource = metadataReader.getResource();

        String className = classMetadata.getClassName();
        if (className.endsWith("er")){
            System.out.println("er --->"+className);
            return true;
        } else {
            System.out.println("not er --->"+className);
            return false;
        }
    }
}
2
3
4
5
6
7
8
9
10
11
12
13
14
15
16
17
18
19
20
21
22
23
24
25
26
27
28
29
30
/**
 * 包扫描 + 注解。实际中也不会这样写,太乱。可能只用简单的,或只使用自定义Filter
 */
// 配置类==配置文件
@Configuration// 告诉Spring这是一个配置类。该类为 容器构造器参数时,可省略该注解(不推荐)
// 每次测试时记得将其他 @Configuration 注释掉,或着注释掉 @ComponentScan
@ComponentScan(
        value = "top.conanan",
        includeFilters = {
                @ComponentScan.Filter(type = FilterType.ANNOTATION, classes = {Controller.class}),
                // Student 没有添加任何注解,也被注册到容器中了
                @ComponentScan.Filter(type = FilterType.ASSIGNABLE_TYPE, classes = {Student.class}),
                // CUSTOM 自定义 Filter
                @ComponentScan.Filter(type = FilterType.CUSTOM, classes = {MyTypeFilter.class})
        },
        excludeFilters = {
                @ComponentScan.Filter(type = FilterType.ANNOTATION, classes = {Service.class})
        },
        useDefaultFilters = false)
// includeFilters 和 excludeFilters 会共同作用,必须都满足(且以 excludeFilters 为准)
public class IocConfig2 {
}
2
3
4
5
6
7
8
9
10
11
12
13
14
15
16
17
18
19
20
21
22
# Stereotype Annotations 🔥
stereotype annotations:模式注解
@Component:用于把当前类对象存入Spirng容器中。注解在实现类上不指定 value 会自动指定 value。且注册的是对象,所以抽象类或接口无法被注册,都是实现类才能被注册
- 属性:
value:用于指定 bean 的 id。不写时默认为当前类名,且首字母小写
- 属性:
@Controller或@RestController:表现层@Service:业务层,标注在实现类上,一般业务代码不需要接口!其他会变化的应该使用接口,如采用策略模式时!@Repository:持久层以上三个注解的作用和属性与
@Componet一致,且底层就是@Componet,是Spring提供明确的三层架构使用的注解,使三层对象更加清晰,也可以使用@Scope、@Conditional注解,详见注册组件—Bean章节:
# 注册组件—@Bean 🔥
提示
适用于第三方包
# @Bean 🔥
用于把当前方法的返回值作为bean对象注册存入Spring容器中。该注解只能写在方法上
value或name用于指定 bean 的 id。没写则默认为当前方法的名称(去除getter、setter 的属性)- 细节:当我们使用注解配置方法时,如果方法有参数,Spring框架会去容器中查找有没有可用的bean对象。查找的方式和
@Autowired注解的作用是一样的
相比模式注解,该方式可以操作对象中的属性(即给属性赋值),可通过构造器、setter 等方式
# @Scope & @Lazy 🔥
用于指定bean的作用范围。也可以放置注解在定义的4个组件上(除过 @Configuration,因为没作用)
value指定范围的取值。常用有:
singleton:单例【默认】,一个应用只有一个对象的实例,IoC容器启动时则会自动创建对象并放入容器。需要注意的是此时也会注入组件,原因是 Bean 的实例化需要所有属性都实例化@Lazy:懒加载,只针对单例对象的创建时间,变为获取对象时才创建(只创建一次),但还是单例。但是需要注意的是,若该对象被一个非 lazy 对象引用了(包含该属性),则该对象的 lazy 不起作用!因为非 lazy 对象实例化时需要所属性都实例化了。可用于所有 Bean,不单单是
@Bean,还有各种@Componet等等prototype:多例,IoC容器启动时不会创建对象,只有每次获取对象时,才会重新创建对象实例request:WEB 项目中,Spring 为每个请求创建一个bean实例session:WEB 项目中,Spring 为每个会话创建一个bean实例global-session:作用于集群(Portlet)环境的全局会话范围,当不是集群(Portlet)环境时,它就是session
/**
 * 包扫描 + 注解
 */
// 配置类==配置文件
@Configuration// 告诉Spring这是一个配置类。该类为 容器构造器参数时,可省略该注解(不推荐)
// 每次测试时记得将其他 @Configuration 注释掉,或着注释掉 @ComponentScan
public class IocConfig2 {

    @Bean
    @Scope("prototype")
    public Person person() {
        System.out.println("给容器中添加 Bean person");
        return new Person("lisi",2);
    }
}
2
3
4
5
6
7
8
9
10
11
12
13
14
15
# @Primary 🔥
在Bean对象添加此注解,则首先注入这个Bean。若@Qualifier指定了,则这个注解失效
# @Conditional + Condition 接口 🔥
条件判断,满足当前条件,这个 Bean 才能被注册到容器中。Spring Boot中使用非常多
可以标在类:满足条件则类中所有 Bean 才会注册
可以标在方法:只限制这个方法的 Bean
value为实现了Condition接口的实现类数组,实现类需重写matches方法/** * Condition */ // 配置类==配置文件 @Configuration// 告诉Spring这是一个配置类。该类为 容器构造器参数时,可省略该注解(不推荐) // 每次测试时记得将其他 @Configuration 注释掉,或着注释掉 @ComponentScan public class IocConfig3 { @Bean("mac-person") @Conditional(MacCondition.class) public Person person(){ return new Person("mac",18); } //可以标在类(满足条件则类中所有Bean才会注册)和方法(只限制这个方法的Bean)上 @Conditional(LinuxCondition.class) @Bean("linus-person") public Person person02(){ return new Person("linus", 48); } }1
2
3
4
5
6
7
8
9
10
11
12
13
14
15
16
17
18
19
20
21public class LinuxCondition implements Condition { /** * * @param context 判断条件能使用的上下文(环境) * @param metadata 注释信息 * @return boolean */ @Override public boolean matches(ConditionContext context, AnnotatedTypeMetadata metadata) { //1、能获取到ioc使用的beanfactory ConfigurableListableBeanFactory beanFactory = context.getBeanFactory(); //2、获取类加载器 ClassLoader classLoader = context.getClassLoader(); //3、获取当前环境信息 Environment environment = context.getEnvironment(); //4、获取到bean定义的注册类 BeanDefinitionRegistry registry = context.getRegistry(); //可以判断容器中的bean注册情况,也可以给容器中注册bean boolean definition = registry.containsBeanDefinition("person"); // 也可以直接获取 application.yml 等中的配置 String property = environment.getProperty("os.name"); System.out.println("os.name:"+property); return Objects.requireNonNull(property).contains("linux"); } }1
2
3
4
5
6
7
8
9
10
11
12
13
14
15
16
17
18
19
20
21
22
23
24
25
26public class MacCondition implements Condition { /** * * @param context 判断条件能使用的上下文(环境) * @param metadata 注释信息 * @return boolean */ @Override public boolean matches(ConditionContext context, AnnotatedTypeMetadata metadata) { //1、能获取到ioc使用的beanfactory ConfigurableListableBeanFactory beanFactory = context.getBeanFactory(); //2、获取类加载器 ClassLoader classLoader = context.getClassLoader(); //3、获取当前环境信息 Environment environment = context.getEnvironment(); //4、获取到bean定义的注册类 BeanDefinitionRegistry registry = context.getRegistry(); //可以判断容器中的bean注册情况,也可以给容器中注册bean boolean definition = registry.containsBeanDefinition("person"); // 也可以直接获取 application.yml 等中的配置 String property = environment.getProperty("os.name"); System.out.println("os.name:"+property); return Objects.requireNonNull(property).contains("Mac"); } }1
2
3
4
5
6
7
8
9
10
11
12
13
14
15
16
17
18
19
20
21
22
23
24
25
26
27public class IocConfig3Test { private ApplicationContext context; @BeforeEach public void init(){ context = new AnnotationConfigApplicationContext(IocConfig3.class); System.out.println("容器创建完成"); } @Test public void test(){ } @AfterEach public void destroy(){ System.out.println("======获取容器中所有 Person bean 名称====="); String[] beanNamesForType = context.getBeanNamesForType(Person.class); for (String s : beanNamesForType) { System.out.println(s); } } }1
2
3
4
5
6
7
8
9
10
11
12
13
14
15
16
17
18
19
20
21
22
23
24
提示
Mac 下无法通过 IDEA 的 VM options 来切换 OS
# @Conditional 派生注解 🔥
Spring注解版原生的@Conditional作用
作用:必须是@Conditional指定的条件成立,才给容器中添加组件,配置类里面的所有内容才生效
| @Conditional扩展注解 | 作用(判断是否满足当前指定条件) |
|---|---|
| @ConditionalOnJava | 系统的 JVM 版本是否符合要求 |
| @ConditionalOnBean | 容器中存在指定Bean |
| @ConditionalOnMissingBean | 容器中不存在指定Bean |
| @ConditionalOnExpression | 满足SpEL表达式 |
| @ConditionalOnClass | 系统中有指定的类 |
| @ConditionalOnMissingClass | 系统中没有指定的类 |
| @ConditionalOnSingleCandidate | 容器中只有一个指定的Bean,或者有多个,但是这个Bean是首选Bean |
| @ConditionalOnProperty | 系统中指定的属性是否有指定的值 |
| @ConditionalOnResource | 类路径下是否存在指定资源文件 |
| @ConditionalOnWebApplication | 当前是web环境 |
| @ConditionalOnNotWebApplication | 当前不是web环境 |
| @ConditionalOnJndi | JNDI存在时查找指定的位置 |
@ConditionalOnProperty
/**
 * ConditionalOnProperty
 */
// 配置类==配置文件
@Configuration// 告诉Spring这是一个配置类。该类为 容器构造器参数时,可省略该注解(不推荐)
// 每次测试时记得将其他 @Configuration 注释掉,或着注释掉 @ComponentScan
public class IocConfig3 {

    // matchIfMissing 默认为 false,改为 true 后,若系统中没有 os.name 属性(不是没有值),则默认注入该 bean
    @Bean("mac-person")
    @ConditionalOnProperty(value="os.name", havingValue="Mac", matchIfMissing = true)
    public Person person(){
        return new Person("mac",18);
    }

    @ConditionalOnProperty(value="os.name", havingValue="linux")
    @Bean("linus-person")
    public Person person02(){
        return new Person("linus", 48);
    }
}
2
3
4
5
6
7
8
9
10
11
12
13
14
15
16
17
18
19
20
21
# @Profile 🔥
指定组件在哪个环境的情况下才能被注册到容器中,不指定,任何环境下都能注册这个组件
加了环境标识的bean,只有这个环境被激活的时候才能注册到容器中。默认不写是default环境,即没有标注环境标识的bean组件在任何环境下都将被注册到容器中
写在配置类上,只有是指定的环境的时候,整个配置类里面的所有配置才能开始生效
写在方法上,只限定方法返回的 Bean
application.yml(目前解析只能这样写,缩近方式获取不到)
db.url: jdbc:mysql://localhost:3306/test
db.driverClass: com.mysql.cj.jdbc.Driver
db.username: root
db.password: 123456
1
2
3
4DataSourceConfig.Class
@Configuration
@PropertySource("classpath:/application.yml")
public class DataSourceConfig implements EmbeddedValueResolverAware {

    private StringValueResolver resolver;

    private String url;

    @Value("${db.username}")
    private String username;

    @Value("${db.driverClass}")
    private String driverClass;

    @Bean("hikariDataSource")
    @Profile({"prod"})
    public DataSource dataSourceProd(@Value("${db.password}") String password){

        HikariConfig config = new HikariConfig();
        url = resolver.resolveStringValue("${db.url}");
        config.setJdbcUrl(url);
        // config.setDriverClassName(driverClass);// 自动检测
        config.setUsername(username);
        config.setPassword(password);
        return new HikariDataSource(config);
    }


    @Bean("druidDataSource")
    @Profile({"dev"})
    public DataSource dataSourceDev(@Value("${db.password}") String password){
        DruidDataSource druidDataSource = new DruidDataSource();
        url = resolver.resolveStringValue("${db.url}");
        druidDataSource.setUrl(url);
        // druidDataSource.setDriverClassName(driverClass);// 自动检测
        druidDataSource.setUsername(username);
        druidDataSource.setPassword(password);
        return druidDataSource;
    }

    @Override
    public void setEmbeddedValueResolver(StringValueResolver resolver) {
        this.resolver = resolver;
    }
}
1
2
3
4
5
6
7
8
9
10
11
12
13
14
15
16
17
18
19
20
21
22
23
24
25
26
27
28
29
30
31
32
33
34
35
36
37
38
39
40
41
42
43
44
45
使用(两种):
运行时使用命令行动态参数:虚拟机参数位置写上
-Dspring.profiles.active=test。Mac 下还是失败 😣代码的方式激活某种环境
public class ProfileTest {

    private AnnotationConfigApplicationContext context;

    @BeforeEach
    public void init(){
        // context = new AnnotationConfigApplicationContext(DataSourceConfig.class);
        context = new AnnotationConfigApplicationContext();
        // 如下就是有参构造的内部实现,多了环境设置
        context.getEnvironment().setActiveProfiles("prod","test");// 设置需要激活的环境
        context.register(DataSourceConfig.class);// 注册主配置类
        context.refresh();// 启动刷新容器
        System.out.println("容器创建完成");
    }

    @Test
    public void test1(){
    }

    @AfterEach
    public void destroy(){
        // 获取容器中所有 bean 名称
        System.out.println("======获取容器中所有 bean 名称=====");
        String[] beanDefinitionNames = context.getBeanDefinitionNames();
        for (String beanDefinitionName : beanDefinitionNames) {
            System.out.println(beanDefinitionName);
        }
        System.out.println("======获取容器中所有 bean 名称=====");

    }
}
1
2
3
4
5
6
7
8
9
10
11
12
13
14
15
16
17
18
19
20
21
22
23
24
25
26
27
28
29
30
31
# 注册组件—@Import 🔥
提示
用于快速导入其他配置类(不像@Bean只能一个个导入),也可以理解为直接导入第三方组件,只能标注在类、接口、枚举类上
# Class
value用于指定其他配置类的Class,是数组,被导入的其他配置类也不用加任何注解,只是一个普通类
- 注册的Bean的id为组件的全类名
- 若是配置类则还会注册配置类配置的Bean(id为指定的或方法名)
@Import({Color.class,Red.class,MyImportSelector.class,MyImportBeanDefinitionRegistrar.class})
//@Import导入组件,id默认是组件的全类名
public class IOCConfig {}
2
3
# ImportSelector 🔥
ImportSelector接口:返回需要导入的组件的全类名数组,需要自定义类实现该接口。Springboot中使用很多🔥
- 注册的Bean的id为组件的全类名
/**
 * 自定义逻辑返回需要导入的组件
 */
public class MyImportSelector implements ImportSelector {
    /**
     *
     * @param importingClassMetadata 当前标注@Import注解的类的其他所有注解
     * @return 要导入到容器中的组件全类名
     */
    @Override
    public String[] selectImports(AnnotationMetadata importingClassMetadata) {
        return new String[]{"top.conanan.bean.Yello",Blue.class.getName()};
    }

  	/**
  	 * TODO
  	 */
    @Override
    public Predicate<String> getExclusionFilter() {
        return null;
    }
}
2
3
4
5
6
7
8
9
10
11
12
13
14
15
16
17
18
19
20
21
22
# ImportBeanDefinitionRegistrar
ImportBeanDefinitionRegistrar接口,手动注册Bean到容器中,需要自定义类实现该接口。可以指定 bean 名称
public class MyImportBeanDefinitionRegistrar implements ImportBeanDefinitionRegistrar {
    /**
     * 把所有需要添加到容器中的bean;调用BeanDefinitionRegistry.registerBeanDefinition手工注册进来
     *
     * @param importingClassMetadata 当前标注@Import注解的类的所有注解信息
     * @param registry BeanDefinition注册类
     * @param importBeanNameGenerator TODO
     */
    @Override
    public void registerBeanDefinitions(AnnotationMetadata importingClassMetadata, BeanDefinitionRegistry registry, BeanNameGenerator importBeanNameGenerator) {
        // 注意 Bean 名称
        boolean definition1 = registry.containsBeanDefinition("top.conanan.bean.Red");
        boolean definition2 = registry.containsBeanDefinition("top.conanan.bean.Yello");
        boolean definition3 = registry.containsBeanDefinition("top.conanan.bean.Blue");

        System.out.println(""+definition1+definition2+definition3);
        if (definition1 && definition2 && definition3){
            // 指定 Bean 的定义信息:Bean 的类型,Bean ...
            RootBeanDefinition rootBeanDefinition = new RootBeanDefinition(RainBow.class);
            // 可以指定 bean 名称
            registry.registerBeanDefinition("rainBow",rootBeanDefinition);
        }
    }
}
2
3
4
5
6
7
8
9
10
11
12
13
14
15
16
17
18
19
20
21
22
23
24
# 注册组件—FactoryBean 🔥
与@Import调用无参构造创建Bean不同的是,它利用工厂获取Bean。多用于整合Spring和其他框架的底层代码
不能在 ColorFactoryBean 类上使用 @Component 注解,没用!!!
/**
 * 创建一个Spring定义的FactoryBean,范型代表要创建的对象类型
 */
public class ColorFactoryBean implements FactoryBean<Color> {
    /**
     * 返回一个Color对象,这个对象会添加到容器中
     *
     * @return 返回一个Color对象
     * @throws Exception
     */
    @Override
    public Color getObject() throws Exception {
        System.out.println("ColorFactoryBean...getObject...");
        return new Color();
    }

    @Override
    public Class<?> getObjectType() {
        return Color.class;
    }

    /**
     * 控制 Bean 是否为单例
     * * true:这个bean是单实例,在容器中保存一份
     * * false:多实例,每次获取都会创建一个新的bean;
     */
    @Override
    public boolean isSingleton() {
        return true;
    }
}
2
3
4
5
6
7
8
9
10
11
12
13
14
15
16
17
18
19
20
21
22
23
24
25
26
27
28
29
30
31
/**
 * FactoryBean
 */
// 配置类==配置文件
@Configuration// 告诉Spring这是一个配置类。该类为 容器构造器参数时,可省略该注解(不推荐)。
// 每次测试时记得将其他 @Configuration 注释掉,或着注释掉 @ComponentScan
// @Import(ColorFactoryBean.class)// 也可以使用 @Bean 来注册 bean,并可以自定义 bean name
public class IocConfig7 {

    @Bean
    public ColorFactoryBean colorFactoryBean(){
        return new ColorFactoryBean();
    }

}
2
3
4
5
6
7
8
9
10
11
12
13
14
15
/**
 * FactoryBean
 */
public class IocConfig7Test {

    private ApplicationContext context;

    @BeforeEach
    public void init(){
        context = new AnnotationConfigApplicationContext(IocConfig7.class);
        System.out.println("容器创建完成");
    }

    @Test
    public void test(){

        // 工厂Bean获取的是工厂bean调用getObject创建的对象。但是容器内始终没有通过getObject创建的对象,只有 ColorFactoryBean
        Object bean1 = context.getBean("colorFactoryBean");
        System.out.println(bean1.getClass());// class top.conanan.bean.Color
        Color bean3 = context.getBean(Color.class);
        System.out.println(bean3.getClass());// class top.conanan.bean.Color

        // 查看 BeanFactory 工厂类接口即可看到该 Field: String FACTORY_BEAN_PREFIX = "&";
        Object bean2 = context.getBean("&colorFactoryBean");
        System.out.println(bean2.getClass());// class top.conanan.bean.ColorFactoryBean
        ColorFactoryBean bean4 = context.getBean(ColorFactoryBean.class);
        System.out.println(bean4.getClass());// class top.conanan.bean.ColorFactoryBean

        // No bean named 'top.conanan.bean.Color' available. Color,color 都不行
        // Object color = context.getBean("color");
    }

    @AfterEach
    public void destroy(){
        // 获取容器中所有 bean 名称
        System.out.println("======获取容器中所有 bean 名称=====");
        String[] beanDefinitionNames = context.getBeanDefinitionNames();
        for (String beanDefinitionName : beanDefinitionNames) {
            System.out.println(beanDefinitionName);
        }
        System.out.println("======获取容器中所有 bean 名称=====");
    }
}
2
3
4
5
6
7
8
9
10
11
12
13
14
15
16
17
18
19
20
21
22
23
24
25
26
27
28
29
30
31
32
33
34
35
36
37
38
39
40
41
42
43
# 注册组件—总结
包扫描+组件标注注解(@Controller/@Service/@Repository/@Component):自己写的类
@Bean:导入的第三方包里面的组件@Import:快速给容器中导入一个组件- @Import(要导入到容器中的组件);容器中就会自动注册这个组件,id默认是全类名
- ImportSelector🔥:返回需要导入的组件的全类名数组。Spring Boot 中使用非常多
- ImportBeanDefinitionRegistrar:手动注册bean到容器中,可指定bean名称
使用Spring提供的
FactoryBean(工厂Bean)。多用于整合Spring和其他框架的底层代码- 默认获取到的是工厂bean调用getObject创建的对象
- 要获取工厂Bean本身,我们需要给id前面加一个
&,&colorFactoryBean
Spring 还提供了一种采用类似@Configuration + 实现接口的方式来注册组件
# 注入组件—自动注入
提示
作用和xml配置文件中的<bean>标签编写<property>标签实现功能一致。利用DI完成依赖关系赋值
AutowiredAnnotationBeanPostProcessor:后置处理器,解析完成自动装配功能(以下四个)
# @Autowired 被动注入🔥
byType:一般在 IoC 容器启动时自动按照类型注入。首先按照类型去找(包括子类、实现类),当容器中有唯一一个 Bean 对象类型和要注入的变量类型匹配,就注入成功,一个都没有则报错,无法启动!类比仅使用 IoC 容器获取 Bean。
byName:如果有多个类型匹配到,则使用变量名称作为 Bean 的 id,在 Spring 容器查找,找到了也可以注入成功,否则报错。类比仅使用 IoC 容器获取 Bean。可以据此来注入一个接口,但是变量名称修改为实现类的名称,即可完成切换注入实现类(不理想,后续推荐使用 @Qualifier 更方便,因为不用修改后面的代码)。
可以使用
required=false指定后,IoC 容器启动时注入失败也不会报错(了解)出现的位置如下:
- 标在构造器上:如果组件只有一个构造器且为有参构造器,这个有参构造器的@Autowired可以省略
- @Bean + 方法参数:参数从容器中获取,则@Autowired可以省略
# FIELD 属性
Spring 不推荐,但是最方便
@ToString
public class Boss1 {

    @Autowired
    private Car car;

    public void print(){
        System.out.println(car);
    }
}
2
3
4
5
6
7
8
9
10
public class Car {
}
2
@Configuration
@Import({Boss1.class, Car.class})
public class DiConfig1 {

}
2
3
4
5
public class DiConfig1Test {

    private ApplicationContext context;

    @BeforeEach
    public void init(){
        context = new AnnotationConfigApplicationContext(DiConfig1.class);
        System.out.println("容器创建完成");
    }

    @Test
    public void test1(){
        Boss1 boss1 = context.getBean(Boss1.class);
        boss1.print();

        Car car = context.getBean(Car.class);
        System.out.println(car);// 这个car和上面那个一致
    }
}
2
3
4
5
6
7
8
9
10
11
12
13
14
15
16
17
18
19
# METHOD 方法注入(setter 注入)
Spring 容器创建当前对象时,就会调用该方法,完成赋值。方法参数的值会自动从容器中获取
@ToString
public class Boss2 {

    private Car car;

    public Car getCar() {
        return car;
    }

    @Autowired// 必须有
    public void setCar(Car car) {
        this.car = car;
    }
}
2
3
4
5
6
7
8
9
10
11
12
13
14
public class Car { }
@Configuration
@Import({Boss2.class, Car.class})
public class DiConfig1 {

}
2
3
4
5
public class DiConfig1Test {

    private ApplicationContext context;

    @BeforeEach
    public void init(){
        context = new AnnotationConfigApplicationContext(DiConfig1.class);
        System.out.println("容器创建完成");
    }

    @Test
    public void test2(){
        Boss2 boss2 = context.getBean(Boss2.class);
        System.out.println(boss2);

        Car car = context.getBean(Car.class);
        System.out.println(car);// 这个car和上面那个一致
    }
}
2
3
4
5
6
7
8
9
10
11
12
13
14
15
16
17
18
19
# CONSTRUCTOR—构造器
- Spring 官方不推荐使用 Field 注入,推荐使用构造器注入(就是比较麻烦),并且容易引发循环依赖!
- 如果组件只有一个构造器且是有参构造器,这个有参构造器上的@Autowired可以省略
@ToString
public class Boss3 {

    private Car car;

    public Boss3(){
        System.out.println("Boss3 无参构造");
    }

    @Autowired// 有多个则不能省略
    public Boss3(Car car){
        this.car = car;
        System.out.println("Boss3 有参构造");
    }
}
2
3
4
5
6
7
8
9
10
11
12
13
14
15
public class Car {
}
2
@Configuration
@Import({Boss3.class, Car.class})
public class DiConfig1 {

}
2
3
4
5
public class DiConfig1Test {

    private ApplicationContext context;

    @BeforeEach
    public void init(){
        context = new AnnotationConfigApplicationContext(DiConfig1.class);
        System.out.println("容器创建完成");
    }

    @Test
    public void test3(){
        Boss3 boss3 = context.getBean(Boss3.class);
        System.out.println(boss3);

        Car car = context.getBean(Car.class);
        System.out.println(car);// 这个car和上面那个一致
    }
}
2
3
4
5
6
7
8
9
10
11
12
13
14
15
16
17
18
19
# PARAMETER—参数 🔥
- @Bean+方法参数,则参数从容器中获取,此时@Autowired可以省略
@ToString
public class Boss4 {

    private Car car;

    public Boss4(){
        System.out.println("Boss4 无参构造");
    }

    public Boss4(Car car){
        this.car = car;
        System.out.println("Boss4 有参构造");
    }
}
2
3
4
5
6
7
8
9
10
11
12
13
14
public class Car {
}
2
@Configuration
@Import({Car.class})
public class DiConfig1 {

    @Bean
    /*@Autowired*/
    public Boss4 boss4(/*@Autowired*/ Car car){
        return new Boss4(car);
    }
}
2
3
4
5
6
7
8
9
10
public class DiConfig1Test {

    private ApplicationContext context;

    @BeforeEach
    public void init(){
        context = new AnnotationConfigApplicationContext(DiConfig1.class);
        System.out.println("容器创建完成");
    }

	 @Test
    public void test4(){
        Boss4 boss4 = context.getBean(Boss4.class);
        System.out.println(boss4);

        Car car = context.getBean(Car.class);
        System.out.println(car);// 这个car和上面那个一致
    }
}
2
3
4
5
6
7
8
9
10
11
12
13
14
15
16
17
18
19
# @Qualifier 主动注入🔥
- 在自动按照类型注入的基础之上,再按照 Bean 的 id 注入
- 在给类成员注入时不能单独使用(配合 @Autowired),但是给方法参数注入时可以单独使用
- 属性:
value用于指定注入的 Bean 的 ID
- 注意:
@Qualifier给方法参数注入时可以单独使用,直接指定 Bean 的 ID - 不推荐,因为不应该依赖具体实现!应该只关心接口!
# @Primary 🔥
在 @Bean 对象添加此注解,则首先注入这个Bean。若@Qualifier指定了,则这个注解失效
# @Resource
JaveEE(JSR250)的注解,耦合性低
- 可以和@Autowired一样实现自动装配功能,默认是按照组件名称进行装配的,找不到再看类型装配。可以独立使用。
- 不支持@Primary功能;不支持@Autowired(reqiured=false);
- 属性:
name用于指定注入的bean的id
# @Inject
JaveEE(JSR330)的注解,耦合性低(也不一定,对于 Spring 开发来说)
- 需要导入
javax.inject依赖。 - 和@Autowired的功能一样,可以使用@Qualifier,只是没有required=false的功能
# 注入组件—Aware接口
若自定义组件想要使用 Spring 容器底层的一些组件,如:ApplicationContext,BeanFactory 等到
- 自定义组件需要实现 xxxAware(参考Aware接口设计):在创建该组件对象的时候,会调用接口规定的方法注入相关组件
- xxxAware:功能实现使用对应的xxxProcessor,如:ApplicationContextAware —> ApplicationContextAwareProcessor
public class Red implements ApplicationContextAware, BeanNameAware, EmbeddedValueResolverAware {

    private ApplicationContext context;

    @Override
    public void setApplicationContext(ApplicationContext applicationContext) throws BeansException {
        this.context = applicationContext;
        System.out.println("传入的IoC: " + applicationContext);
        // 传入的IoC: org.springframework.context.annotation.AnnotationConfigApplicationContext@df27fae, started on Wed May 06 00:37:46 CST 2020
    }

    @Override
    public void setBeanName(String name) {
        System.out.println("当前 bean 的名字: " + name);
        // 当前 bean 的名字: top.conanan.aware.Red
    }

    @Override
    public void setEmbeddedValueResolver(StringValueResolver resolver) {
        String resolveStringValue = resolver.resolveStringValue("你好 ${os.name} 我是 #{20*18}");
        System.out.println("解析的字符串:"+resolveStringValue);
        // 解析的字符串:你好 Mac OS X 我是 360
    }
}
2
3
4
5
6
7
8
9
10
11
12
13
14
15
16
17
18
19
20
21
22
23
24
@Configuration
@Import(Red.class)
public class AwareConfig1 {

}
2
3
4
5
public class AwareConfig1Test {

    private ApplicationContext context;

    @BeforeEach
    public void init(){
        context = new AnnotationConfigApplicationContext(AwareConfig1.class);
        System.out.println("容器创建完成");
    }

    @Test
    public void test1(){
    }

    @AfterEach
    public void destroy(){
        // 获取容器中所有 bean 名称
        System.out.println("======获取容器中所有 bean 名称=====");
        String[] beanDefinitionNames = context.getBeanDefinitionNames();
        for (String beanDefinitionName : beanDefinitionNames) {
            System.out.println(beanDefinitionName);
        }
        System.out.println("======获取容器中所有 bean 名称=====");
    }
}
2
3
4
5
6
7
8
9
10
11
12
13
14
15
16
17
18
19
20
21
22
23
24
25
# 自动配置 — @SpringBootApplication 🔥
# 为什么要有自动装配? 🔥
对比 XML 时代的 Spring 配置,会发现虽然项目不同,但是有那么一部分(甚至一大部分)的配置都是不变的,像是从一个项目复制到另一个项目里。而 Spring Boot 的出现就是解决了这个问题,通过约定大于配置来默认自动配置。
# @SpringBootApplication
按住Ctrl点击查看启动类MySpringBootApplication上的注解@SpringBootApplication,源码如下:
@Target(ElementType.TYPE)
@Retention(RetentionPolicy.RUNTIME)
@Documented
@Inherited
@SpringBootConfiguration
@EnableAutoConfiguration
@ComponentScan(excludeFilters = {
		@Filter(type = FilterType.CUSTOM, classes = TypeExcludeFilter.class),
		@Filter(type = FilterType.CUSTOM, classes = AutoConfigurationExcludeFilter.class) })
public @interface SpringBootApplication {

	/**
	 * Exclude specific auto-configuration classes such that they will never be applied.
	 * @return the classes to exclude
	 */
	@AliasFor(annotation = EnableAutoConfiguration.class)
	Class<?>[] exclude() default {};

	... ... ...

}
2
3
4
5
6
7
8
9
10
11
12
13
14
15
16
17
18
19
20
21
# @SpringBootConfiguration
等同与@Configuration,既标注该类是Spring的一个配置类
# @EnableAutoConfiguration
SpringBoot 自动配置功能开启。不是用于自己写的 Bean,而是配置三方库中的 Bean
按住Ctrl点击查看该注解
@Target(ElementType.TYPE)
@Retention(RetentionPolicy.RUNTIME)
@Documented
@Inherited
@AutoConfigurationPackage
@Import(AutoConfigurationImportSelector.class)
public @interface EnableAutoConfiguration {
	... ... ...
}
2
3
4
5
6
7
8
9
# @AutoConfigurationPackage
自动配置包**,**如下注解的简写
@Import(AutoConfigurationPackages.Registrar.class)
# @Import
Spring底层注解@Import,给容器中导入一个组件;导入的组件由AutoConfigurationImportSelector.class指定,这个类有一个方法,通过注解metadata,将主配置类(@SpringBootApplication)所在包及下面所有子包里面的所有组件扫描到Spring容器
按住Ctrl点击查看AutoConfigurationImportSelector源码
public String[] selectImports(AnnotationMetadata annotationMetadata) {
    ... ... ...
        List<String> configurations = getCandidateConfigurations(annotationMetadata,
                                                                 attributes);
    configurations = removeDuplicates(configurations);
    Set<String> exclusions = getExclusions(annotationMetadata, attributes);
    checkExcludedClasses(configurations, exclusions);
    configurations.removeAll(exclusions);
    configurations = filter(configurations, autoConfigurationMetadata);
    fireAutoConfigurationImportEvents(configurations, exclusions);
    return StringUtils.toStringArray(configurations);
}


protected List<String> getCandidateConfigurations(AnnotationMetadata metadata,
                                                  AnnotationAttributes attributes) {
    List<String> configurations = SpringFactoriesLoader.loadFactoryNames(
        getSpringFactoriesLoaderFactoryClass(), getBeanClassLoader());

    return configurations;
}
2
3
4
5
6
7
8
9
10
11
12
13
14
15
16
17
18
19
20
21
其中,SpringFactoriesLoader.loadFactoryNames 方法的作用就是从META-INF/spring.factories文件中读取指定类对应的全类名的列表,如xxxAutoConfiguration
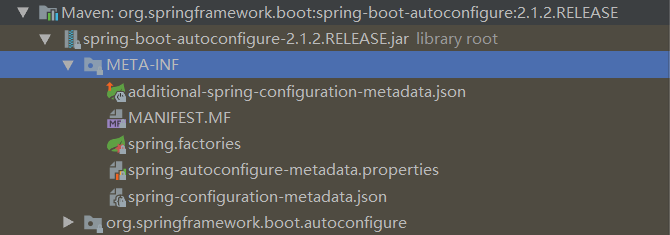
spring-autoconfigure-metadata.properties 文件中有关自动配置的配置信息如下:
org.springframework.boot.autoconfigure.web.reactive.function.client.WebClientAutoConfiguration,\
org.springframework.boot.autoconfigure.web.servlet.DispatcherServletAutoConfiguration,\
org.springframework.boot.autoconfigure.web.servlet.ServletWebServerFactoryAutoConfiguration,\
org.springframework.boot.autoconfigure.web.servlet.error.ErrorMvcAutoConfiguration,\
org.springframework.boot.autoconfigure.web.servlet.HttpEncodingAutoConfiguration,\
org.springframework.boot.autoconfigure.web.servlet.MultipartAutoConfiguration,\
......
2
3
4
5
6
7
上面配置文件存在大量的以Configuration为结尾的类名称,这些类就是存有自动配置信息的类,而SpringApplication在获取这些类名后再加载
我们以ServletWebServerFactoryAutoConfiguration为例来分析源码:
@Configuration
@AutoConfigureOrder(Ordered.HIGHEST_PRECEDENCE)
@ConditionalOnClass(ServletRequest.class)
@ConditionalOnWebApplication(type = Type.SERVLET)
@EnableConfigurationProperties(ServerProperties.class)
@Import({ ServletWebServerFactoryAutoConfiguration.BeanPostProcessorsRegistrar.class,
		ServletWebServerFactoryConfiguration.EmbeddedTomcat.class,
		ServletWebServerFactoryConfiguration.EmbeddedJetty.class,
		ServletWebServerFactoryConfiguration.EmbeddedUndertow.class })
public class ServletWebServerFactoryAutoConfiguration {
	......
}
2
3
4
5
6
7
8
9
10
11
12
13
其中,@EnableConfigurationProperties(ServerProperties.class)代表加载ServerProperties服务器配置属性类
进入ServerProperties.class源码如下:
@ConfigurationProperties(prefix = "server", ignoreUnknownFields = true)
public class ServerProperties {
    /**
	 * Server HTTP port.
	 */
    private Integer port;
    /**
	 * Network address to which the server should bind.
	 */
    private InetAddress address;
	......
}
2
3
4
5
6
7
8
9
10
11
12
13
其中,prefix = "server" 表示SpringBoot配置文件中的前缀,SpringBoot会将配置文件中以server开始的属性映射到该类的字段中。如在application.properties中配置server.port=80即可改变当前服务器的HTTP端口号
自动配置总结
SpringBoot启动会加载大量的自动配置类
我们看我们需要的功能有没有SpringBoot默认写好的自动配置类;
我们再来看这个自动配置类中到底配置了哪些组件;(只要我们要用的组件有,我们就不需要再来配置了)
给容器中自动配置类添加组件的时候,会从properties类中获取某些属性。我们就可以在配置文件中指定这些属性的值;
自动配置类对应属性类
- xxxxAutoConfigurartion:自动配置类;给容器中添加组件
- xxxxProperties:封装配置文件中相关属性;
# SPI 机制的应用 🔥
Service Provider Interface,应对变化的解决方案,上面的 @EnableXXX 就是对 SPI 的应用。基于 Interface 接口 + 策略模式 + 配置文件(如 spring.factories)。
之前讲过的 @Primary 和 @Conditionxx 也可以解决,但是关注的粒度是具体类、对象。而 SPI 关注的是整体解决方案,关注许多类,对象的整体!
# 参考
# XML 配置(旧)
# 步骤
在resources中创建
spring-config.xml或applicationContext.xml文件。(约束在参考中搜索xmlns即可找到)<?xml version="1.0" encoding="UTF-8"?> <beans xmlns="http://www.springframework.org/schema/beans" xmlns:xsi="http://www.w3.org/2001/XMLSchema-instance" xsi:schemaLocation="http://www.springframework.org/schema/beans http://www.springframework.org/schema/beans/spring-beans.xsd"> </beans>1
2
3
4
5
6在配置文件中配置让 spring 创建的对象(原理和引入中工厂模式一致)
<bean id="accountDao" class="com.itheima.dao.impl.AccountDaoImpl"></bean>
<bean id="accountService" class="com.itheima.service.impl.AccountServiceImpl"></bean>
1
2获取Spring IoC核心容器,并根据id获取对象
ApplicationContext ac = new ClassPathXmlApplicationContext("spring-config.xml");
AccountDao accountDao = (AccountDao) ac.getBean("accountDao"); //需要强转
AccountService accountService = ac.getBean("accountService", AccountService.class); //传字节码文件对象,不用强转
1
2
3
# Spirng对Bean的管理细节
bean标签
作用:配置对象让spring来创建的。默认情况下它调用的是类中的无参构造函数。如果没有无参构造函数则不能创建成功。
属性:
id:给对象在容器中提供一个唯一标识,用于获取对象class:指定类的全限定类名,用于反射创建对象,默认情况下调用无参构造函数scope:指定对象的作用范围singleton:单例的(默认),一个应用只有一个对象的实例,它的作用范围就是整个应用prototype:多例的,每次访问对象时,都会重新创建对象实例。request:WEB 项目中,Spring 为每个请求创建一个bean实例session:WEB 项目中,Spring 为每个会话创建一个bean实例global-session:作用于集群(Portlet)环境的全局会话范围,当不是集群(Portlet)环境时,它就是session
init-method:指定类中的初始化方法名称destroy-method:指定类中销毁方法名称。单例中需要关闭容器(使用实现类的方法)
Bean对象的生命周期
单例对象:生命周期和容器相同,一个应用只有一个对象的实例,它的作用范围就是整个应用
- 出生:当容器创建时出生(读取完配置文件)
- 存活:只要容器存在,对象一直存活
- 死亡:容器销毁,对象消亡
多例对象:每次访问对象时,都会重新创建对象实例。
- 出生:当我们使用对象时,Spring框架为我们创建
- 存活:对象只要在使用过程中,就一直存活
- 死亡:当对象长时间不使用,且没有别的对象引用时,由Java的GC机制回收
创建Bean的三种方式
使用默认构造方法创建
配置文件中使用
bean标签以及id和class属性,且没有其他属性和标签时~。若类中没有默认构造方法,则对象无法创建<bean id="accountDao" class="com.itheima.dao.impl.AccountDaoImpl"></bean>1使用普通工厂中的方法创建对象(也称使用某个类中的方法创建对象),并存入Spirng容器
<bean id="accountDaoFactory" class="com.itheima.factory.AccountDaoFactory"></bean>
<bean id="accountDao" factory-bean="accountDaoFactory" factory-method="getAccountDao"></bean>
1
2使用静态工厂中的静态方法创建对象(也称使用某个类中的静态方法创建对象),并存入Spirng容器
<bean id="accountDao" class="com.itheima.factory.AccountDaoFactory" factory-method="getAccountDao"></bean>1
# 依赖注入
我们的业务层仍会调用持久层的方法,在使用 spring 之后,就让 spring 来维护了他们的依赖关系。就是让框架把持久层对象传入业务层,不用自己去获取。
DI(Dependency Injection):依赖注入,即是依赖关系的维护交由Spirng管理。
能注入的数据有三类:(不适用于经常变换的数据)
- 基本类型和String
- 其他bean类型(在配置文件或注解中配置过的bean)
- 复杂类型/集合类型:如Array、List、Set、Map、Properties
构造方法注入
使用类中的构造方法给成员变量赋值。注意:赋值的操作不是我们自己做的,而是通过配置的方式,让spring框架来为我们注入
要求:类中需要提供一个对应参数列表的构造方法
标签:
bean标签中**constructor-arg**属性:
index:指定参数在构造函数参数列表的索引位置,从0开始。不常用。type:指定参数在构造函数中的数据类型。不常用。name:指定参数在构造函数中的名称value:它能赋的值是基本数据类型和 String 类型ref:它能赋的值是其他 bean 类型,也就是说,必须得是配置过的 bean
<bean id="accountService" class="com.itheima.service.impl.AccountServiceImpl">
    <constructor-arg name="name" value=" 张三 "></constructor-arg>  <!--String类型-->
    <constructor-arg name="age" value="18"></constructor-arg>       <!--基本类型-->
    <constructor-arg name="birthday" ref="now"></constructor-arg>   <!--其他bean类型-->
</bean>
<bean id="now" class="java.util.Date"></bean>
2
3
4
5
6
- 优势:在获取bean对象时,注入数据是必须的操作,否则对象无法创建成功。
- 弊端:优势也是其弊端,改变了bean对象的实例化方式。创建对象时,即使用不到这些数据,也必须提供。
c-命名空间注入(本质是构造方法注入):无法实现装配集合
set方法注入(使用最多)
要求:就是在类中提供需要注入成员的 set 方法
标签:
bean标签中**property**属性:
name:找的是类中 set 方法后面的部分value:它能赋的值是基本数据类型和 String 类型ref:它能赋的值是其他 bean 类型,也就是说,必须得是配置过的 bean
<bean id="accountService" class="com.itheima.service.impl.AccountServiceImpl">
    <property name="name" value="test"></property> <!--String类型-->
    <property name="age" value="21"></property>    <!--基本类型-->
    <property name="birthday" ref="now"></property> <!--其他bean类型-->
</bean>
<bean id="now" class="java.util.Date"></bean>
2
3
4
5
6
- 优势:创建对象时,注入的参数没有明确限制,可以直接使用默认构造方法
- 弊端:优势也是其弊端,若某个成员必须有值,则获取对象时有可能set方法没有执行
p-命名空间注入(本质还是调用 set 方法):无法实现装配集合
注入集合属性
就是给类中的集合成员传值,可以采用set方法注入的方式,只不过变量的数据类型都是集合
注入集合数据:只要结构相同,标签可以互换
- List结构可以用:array、list、set
- Map结构可以用:map、entry;props、prop。但是properties只能存储键值都是字符串的数据。
<bean id="accountService" class="com.itheima.service.impl.AccountServiceImpl">
 <!-- 在注入集合数据时,只要结构相同,标签可以互换 -->
    <!-- 给数组注入数据 -->
    <property name="myStrs">
        <set>
            <value>AAA</value>
            <ref bean="car"></ref><!--也可以引用类型。只是列出来参考,实际不会这样存储不同类型数据-->
        </set>
    </property>
    <!-- 注入 list 集合数据 -->
    <property name="myList">
        <array>
            <value>AAA</value>
            <ref bean="car"></ref><!--也可以引用类型。只是列出来参考,实际不会这样存储不同类型数据-->
        </array>
    </property>
    <!-- 注入 set 集合数据 -->
    <property name="mySet">
        <list>
            <value>AAA</value>
            <ref bean="car"></ref><!--也可以引用类型。只是列出来参考,实际不会这样存储不同类型数据-->
        </list>
    </property>
    <!--=============================================-->
    <!-- 注入 Map 数据 -->
    <property name="myMap">
        <map>
            <entry key="testA" value="aaa"></entry>
            <entry key-ref="car" value-ref="car"></entry> <!--key,value,key-ref,value-ref  共4种组合 -->

            <!--value-type="cn.itcast.pojo.Car"   可以不设置,设置后值类型唯一-->
      <!--  <entry key="testB">   也可以这样写,但是麻烦
                <value>bbb</value>
            </entry>  -->
        </map>
    </property>
    <!-- 注入 properties 数据-->
    <property name="myProps">
          <props>
            <prop key="testA">aaa</prop>
            <prop key="testB">bbb</prop>
        </props>
    </property>
</bean>
<!--========================被引用的测试bean =====================================-->
<bean name="car" class="cn.itcast.pojo.Car">
    <property name="name" value="BMW"></property>
    <property name="color" value="red"></property>
</bean>
2
3
4
5
6
7
8
9
10
11
12
13
14
15
16
17
18
19
20
21
22
23
24
25
26
27
28
29
30
31
32
33
34
35
36
37
38
39
40
41
42
43
44
45
46
47
48
49