 基本使用
基本使用
# 多线程—基本使用
# 线程调度模型
- 线程调度模型(应用程序的执行都是CPU 在多个线程间快速切换完成的)
- 分时调度模型(时间片):所有线程轮流使用 CPU 的使用权,平均分配每个线程占用 CPU 的时间片
- 抢占式调度模型:优先让优先级高的线程使用 CPU,如果线程的优先级相同,那么会随机选择一个,优先级高的线程获取的 CPU 时间片相对多一些
- Java 的线程调度方法
- 同优先级线程组成先进先出队列(先到先服务),使用时间片策略
- 对高优先级,使用优先调度的抢占式策略
# 线程运行原理 🔥
# Java Virtual Machine
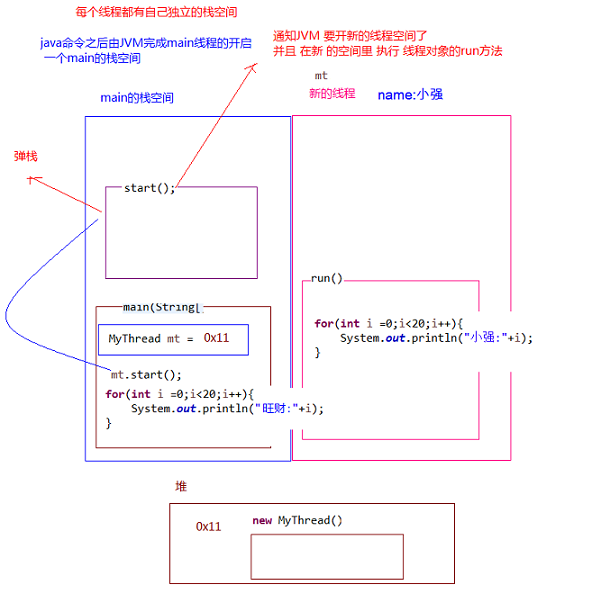
JVM 由堆、方法区、虚拟机栈、本地方法栈、程序计数器所组成,其中栈内存是给谁用的呢?其实就是线程,每个线程启动后,虚拟机就会为其分配一块栈内存。
- 每个栈由多个栈帧(Frame)组成,对应着每次方法调用时所占用的内存。
- 每个线程只能有一个活动栈帧,对应着当前正在执行的那个方法。
画个图就很好理解了(具体还需要学习JVM)
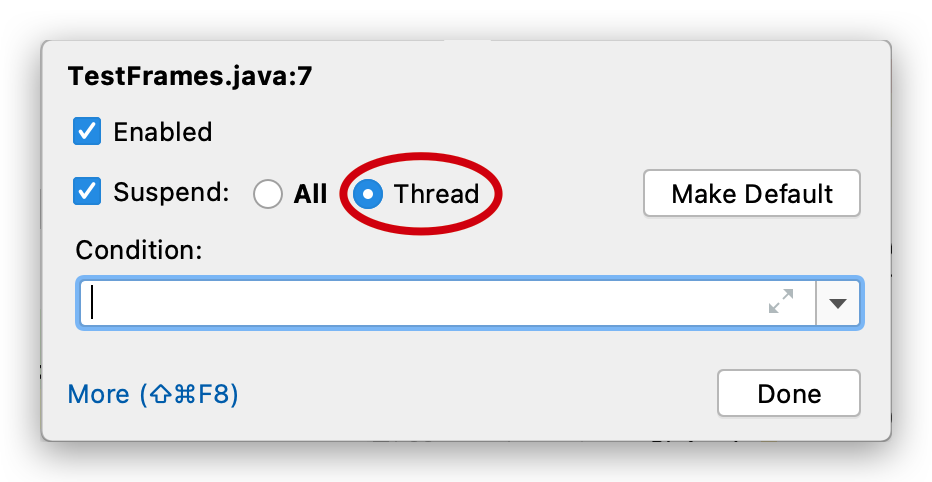
多个线程 debug 时可以对要查看的多个线程都设置 suspend(挂起)为 Thread,才能让线程分别挂起,分别调试
# 线程的上下文切换
Thread Context Switch
因为以下一些原因导致 cpu 不再执行当前的线程,转而执行另一个线程的代码
- 线程的 cpu 时间片用完
- 垃圾回收
- 有更高优先级的线程需要运行
- 线程自己调用了 sleep、yield、wait、join、park、synchronized、lock 等方法
当 Context Switch 发生时,需要由操作系统保存当前线程的状态,并恢复另一个线程的状态,Java 中对应的概念就是程序计数器(Program Counter Register),它的作用是记住下一条 jvm 指令的执行地址,是线程私有的
状态包括程序计数器、虚拟机栈中每个栈帧的信息,如局部变量、操作数栈、返回地址等
Context Switch 频繁发生会影响性能
# Java 多线程的运行过程 🔥
Java 程序运行原理(多线程):由 Java 命令启动 JVM(相当于启动了一个进程),接着由该进程创建启动多个线程,至少三个线程可以分析出来:执行 main()函数的主线程,该线程的任务代码都定义在 main 函数中,负责垃圾回收的 GC 线程,以及异常处理线程
- 多线程执行时,其实每一个执行线程都有一片自己所属的栈内存空间(还有 PC)。进行方法的压栈和弹栈。
# 线程的创建和使用 🔥
# Thread 构造方法 🔥
Thread():分配一个新的线程对象。Thread(String name):分配一个指定名字的新的线程对象Thread(Runnable target):分配一个带有指定目标新的线程对象,它实现了 Runnable 接口中的run方法Thread(Runnable target,String name):分配一个带有指定目标新的线程对象并指定名字
# 1. 继承 Thread 类—匿名内部类
- 定义子类继承 Thread 类。可以写无参和带参构造以便直接定义线程名称。
- 子类中 Override 重写 Thread 类的
run()方法,将线程的任务代码封装到run()方法中。 - 创建 Thread 的子类对象,即创建了线程对象。
- 调用线程对象的**
start(),JVM 将调用该线程的run()**方法执行(多次启动一个线程非法,即使执行完毕)
@Slf4j(topic = "Test1")
public class Test1 {

    public static void main(String[] args) {
        Thread t1 = new Thread("t1") {
            @Override
            public void run() {
                log.debug("running");
            }
        };

        t1.start();

        log.debug("running");
    }
}
2
3
4
5
6
7
8
9
10
11
12
13
14
15
16
# 2. 实现 Runnable 接口
- 定义类实现 Runnable 接口
- @Override 重写接口中的
run()方法,将线程的任务代码封装到run()方法中 - 通过 Thread 类创建线程对象,并将 Runnable 接口的子类对象作为 Thread 类的构造函数的参数进行传递。线程的任务都封装在 Runnable 接口实现类对象的 run 方法中,所以要在线程对象创建时就必须明确要运行的任务
- 调用**
start()开启线程**,JVM 调用该线程的**run()**方法执行(多次启动一个线程非法,即使执行完毕)
@Slf4j(topic = "Test2")
public class Test2 {
    public static void main(String[] args) {
        // 普通实现
        Runnable r0 = new Runnable() {
            @Override
            public void run() {
                log.debug("running");
            }
        };

        // lambda表达式实现
        r1 = () -> log.debug("running");

        Thread t1 = new Thread(r1, "t1");
        t1.start();

        log.debug("running");

    }
}
2
3
4
5
6
7
8
9
10
11
12
13
14
15
16
17
18
19
20
21
# 3. 实现 Callable 接口 + Future
与使用 Runnable 相比, Callable 功能更强大些(JDK5.0 新增):
使用
FutureTask类封装实现了Callable接口的实现类,并传入Thread的构造方法中,调用start方法相比
run()方法,实现 Callable接口需要实现call()方法,可以有返回值(支持泛型),可以抛出异常调用
FutureTask的get()阻塞等待任务代码执行完毕,获取返回值
Future接口:
- 可以对具
Runnable、Callable任务的执行结果进行取消、查询是否完成、获取结果等。 FutrueTask是Futrue接口的唯一的实现类FutureTask同时实现了Runnable,Future接口。它既可以作为Runnable被线程执行,又可以作为Future得到Callable的返回值
@Slf4j(topic = "Test3")
public class Test3 {
    public static void main(String[] args) throws ExecutionException, InterruptedException {

        // 普通实现
        Callable<Integer> c0 = new Callable<Integer>() {
            @Override
            public Integer call() throws Exception {
                log.debug("Callable ...");
                Thread.sleep(2000);
                return 1 + 1;
            }
        };

        // lambda表达式实现
        FutureTask<Integer> c1 = new FutureTask<>(() -> {
            log.debug("Callable ...");
            Thread.sleep(2000);
            return 1 + 1;
        });

        Thread t1 = new Thread(c1, "t1");
        t1.start();

        int value = c1.get();
        log.debug("value: {}", value);
    }
}
2
3
4
5
6
7
8
9
10
11
12
13
14
15
16
17
18
19
20
21
22
23
24
25
26
27
28
# 线程池
- 背景:经常创建和销毁、使用量特别大的资源,比如并发情况下的线程, 对性能影响很大。
- 线程池:其实就是一个容纳多个线程的容器,其中的线程可以反复使用,使用完自动归还,省去了频繁创建线程对象的操作, 无需反复创建线程而消耗过多资源。
- 好处:
- 降低资源消耗(重复利用线程池中线程,不需要每次都创建)
- 提高响应速度(减少了创建新线程的时间)
- 便于线程管理
- JDK 5.0 起提供了线程池的顶级接口是
java.util.concurrent.Executor,但是严格意义上讲它只是一个执行线程的工具。真正的线程池接口是java.util.concurrent.ExecutorService(官方建议使用java.util.concurrent.Executors线程池工厂类来创建线程池对象):void execute(Runnable command):执行任务/命令,没有返回值,一般用来执行Runnable<T> Future<T> submit(Callable<T> task):执行任务,有返回值,一般又来执行Callablevoid shutdown():关闭线程池,不建议执行
- 常见
ExecutorService线程池对象有:ExecutorService static newCachedThreadPool():可根据需要创建新线程的线程池ExecutorService static newFixedThreadPool(int maxThreads):可重用固定线程数的线程池ExecutorService static newSingleThreadExecutor():只有一个线程的线程池ExecutorService static newScheduledThreadPool(n):可安排在给定延迟后运行命令或者定期地执行
- 参数(常考):
- corePoolSize:核心池的大小
- maximumPoolSize:最大线程数
- keepAliveTime:线程没有任务时最多保持多长时间后会终止
- setRejectedExecutionHandler
- setThreadFactory
ExecutorService service = Executors.newFixedThreadPool(10);
ThreadPoolExecutor service1 = (ThreadPoolExecutor) service;
// 设置线程池的属性
// System.out.println(service.getClass());
// service1.setCorePoolSize(15);
// service1.setKeepAliveTime();
service.execute(new NumberThread());//适合适用于Runnable
service.execute(new NumberThread1());//适合适用于Runnable
service.submit(Callable callable);//适合使用于Callable
//关闭连接池
service.shutdown();
2
3
4
5
6
7
8
9
10
11
# 线程优先级 🔥
- 线程的优先级等级(通过 Thread 的静态常量)
Thread.MAX_PRIORITY:10Thread.MIN _PRIORITY:1Thread.NORM_PRIORITY:5,默认
- 方法
getPriority():返回线程优先级setPriority(int newPriority):改变线程的优先级,需在 start 前设置
- 说明
- 线程创建时继承父线程的优先级
- 线程优先级仅仅会提示(hint)调度器优先调度该线程,调度器可以忽略它。若CPU比较忙,那么优先级高的线程会获得更多的时间片,但CPU闲时,优先级几乎没作用。低优先级只是获得调度的概率低,并非一定是在高优先级线程之后才被调用。看上面 yield 的代码测试。
# 主线程 & 守护线程 🔥
默认情况下,Java 进程需要等待所有线程都运行结束,才会结束。有一种特殊的线程叫做守护线程,只要其它非守护线程运行结束了,即使守护线程的代码没有执行完,也会强制结束。
守护线程(后台线程)和用户线程在几乎每个方面都是相同的,唯一的区别是判断 JVM 何时离开
守护线程是用来服务用户线程的,在start()方法前调用th.setDaemon(true)可以把一个用户线程变成一个守护线程
若 JVM 中都是守护线程,当前 JVM 将退出
@Slf4j(topic = "TestDaemon")
public class TestDaemon {

    public static void main(String[] args) throws InterruptedException {

        Thread t1 = new Thread(() -> {

            while (true){
                log.debug("{}正在运行...", Thread.currentThread().getName());
                if (Thread.currentThread().isInterrupted()){
                    break;
                }
            }
            log.debug("{}运行结束...", Thread.currentThread().getName());// daemon结束不会执行该行

        }, "daemon");
        // 设置该线程为守护线程
        t1.setDaemon(true);
        t1.start();
        TimeUnit.SECONDS.sleep(1);
        log.debug("{}运行结束...", Thread.currentThread().getName());
    }
}
2
3
4
5
6
7
8
9
10
11
12
13
14
15
16
17
18
19
20
21
22
23
Java 垃圾回收线程就是一个典型的守护线程
Tomcat 中的 Acceptor(接收请求) 和 Poller(分发请求) 线程都是守护线程,所以 Tomcat 接收到 shutdown 命令后,不会等待它们处理完当前请求
# 基本方法
static Thread currentThread():获取当前正在执行的线程,在 Thread 子类中就是 this,通常用于主线程和 Runnable 实现类String getName():获取当前线程名称void setName():设置当前线程名称,或通过线程类的有参构造设置getId():获取线程长整型的 id(唯一)
# 常用方法—start & run 🔥
# start
void start():启动线程,JVM 执行此线程对象的run()方法
该方法只是让线程进入就绪状态,里面代码不一定立刻运行(CPU 的时间片还没分给它)。每个线程对象的start方法只能调用一次,如果调用了多次会出现 IllegalThreadStateException
# run
void run():线程在被调度时执行底层的操作。直接调用则没有多线程效果,仅仅是main线程中调用下该任务
如果在构造 Thread 对象时传递了 Runnable 参数,则线程启动后会调用 Runnable 中的 run 方法,否则默认不执行任何操作。但可以创建 Thread 的子类对象,来覆盖默认行为
# 常用静态方法—sleep & yield 🔥
# sleep
static void sleep(long millis)
线程睡眠。使当前正在执行的线程以指定的毫秒数睡眠,不释放锁
调用 sleep 会让当前线程从 Running 进入 Timed Waiting 状态
其它线程可以使用 interrupt 方法打断正在睡眠的线程,这时 sleep 方法会抛出 InterruptedException
睡眠结束后的线程未必会立刻得到执行,需要得到处理器的等资源
建议用
TimeUnit的sleep代替 Thread 的 sleep 来获得更好的可读性
@Slf4j(topic = "SleepTest")
public class SleepTest {
    public static void main(String[] args) {
        Thread t1 = new Thread(() -> {
            try {
                // Thread.sleep(2000);
                TimeUnit.SECONDS.sleep(2);
            } catch (InterruptedException e) {
                e.printStackTrace();
            }
        }, "t1");

        t1.start();
        log.debug("t1 state: {}", t1.getState());// RUNNABLE

        try {
            // 可能main线程快执行完了,才执行t1,所以让main线程休眠下
            TimeUnit.MILLISECONDS.sleep(500);
        } catch (InterruptedException e) {
            e.printStackTrace();
        }
        log.debug("t1 state: {}", t1.getState());// TIMED_WAITING
    }
}
2
3
4
5
6
7
8
9
10
11
12
13
14
15
16
17
18
19
20
21
22
23
24
@Slf4j(topic = "interruptTest")
public class InterruptTest {
    public static void main(String[] args) throws InterruptedException {
        Thread t1 = new Thread(() -> {
            try {
                log.debug("enter sleep...");
                TimeUnit.SECONDS.sleep(2);
                log.debug("what's the fuck!!!");// 不会执行!!!interrupt 不是 notify
            } catch (InterruptedException e) {
                log.debug("be interrupt...");
                e.printStackTrace();
            }
        }, "t1");

        t1.start();
        TimeUnit.SECONDS.sleep(1);
        log.debug("interrupt...");
        t1.interrupt();

        // 22:11:31.589 [t1] DEBUG interruptTest - enter sleep...
        // 22:11:32.589 [main] DEBUG interruptTest - interrupt...
        // 22:11:32.589 [t1] DEBUG interruptTest - be interrupt...
    }
}
2
3
4
5
6
7
8
9
10
11
12
13
14
15
16
17
18
19
20
21
22
23
24
# yield
static void yield() 不会进入阻塞状态
线程让步。暂停当前正在执行的线程(系统指定的毫秒数),把执行机会让给优先级相同或更高的线程,并执行其他线程。若队列中没有同优先级的线程,忽略此方法。转为 RUNNABLE 的就绪状态(不会进入阻塞状态),该线程不会失去任何监视器的所有权(不释放锁)。不确保真正让出,具体实现依赖操作系统的任务调度器,很少用,主要是为了测试和调试。
@Slf4j(topic = "yieldTest")
public class YieldTest {

    public static void main(String[] args) {

        Runnable task1 = () -> {
            int count = 0;
            for (; ; ) {
                System.out.println("=====> task1 " + count++);
            }
        };

        Runnable task2 = () -> {
            int count = 0;
            for (; ; ) {
                // 1 测试 yield(这个很明显)
                Thread.yield();
                System.out.println("            =====> task2 " + count++);
            }
        };

        Thread t1 = new Thread(task1, "t1");
        Thread t2 = new Thread(task2, "t2");
        // 2 测试优先级(看CPU空闲核心数吧,可能都并行执行了)
        // t1.setPriority(Thread.MIN_PRIORITY);
        // t2.setPriority(Thread.MAX_PRIORITY);
        t1.start();
        t2.start();
    }
}
2
3
4
5
6
7
8
9
10
11
12
13
14
15
16
17
18
19
20
21
22
23
24
25
26
27
28
29
30
# 常用方法—join 同步 🔥
# join
join([long n]):线程插队。底层就是 wait
当某个程序执行流中调用其他线程的join()方法时,执行流线程将进入WAITING 或 TIMED_WAITING,直到join()方法加入的线程执行完毕(或最多等待n毫秒),执行流线程才进入RUNNABLE状态。
# 为什么需要 join?为了同步!
下面的代码执行,打印 r 是什么?
@Slf4j(topic = "testJoin")
public class TestJoin {
    static int r = 0;

    public static void main(String[] args) {
        test1();
    }

    private static void test1() {
        log.debug("开始");
        Thread t1 = new Thread(() -> {
            try {
                log.debug("开始");
                TimeUnit.SECONDS.sleep(1);
                log.debug("结束");
                r = 10;
            } catch (InterruptedException e) {
                e.printStackTrace();
            }

        }, "t1");
        t1.start();
        log.debug("结果为:{}", r);
        log.debug("结束");
    }
}
2
3
4
5
6
7
8
9
10
11
12
13
14
15
16
17
18
19
20
21
22
23
24
25
26
分析
因为主线程和线程 t1 是并行执行的,t1 线程需要 1 秒之后才能算出 r=10
而主线程一开始就要打印 r 的结果,所以只能打印出 r=0
解决方法
用 sleep 行不行?为什么?
不行,不知道t1线程究竟要执行多久,所以main线程无法控制sleep的时间
用 join,加在 t1.start() 之后即可。目前可以。但是可以使用更好的 Callable 解决
@Slf4j(topic = "testJoin")
public class TestJoin {

    static int r = 0;

    public static void main(String[] args) throws InterruptedException {
        test1();
    }

    private static void test1() throws InterruptedException {
        log.debug("开始");
        Thread t1 = new Thread(() -> {
            try {
                log.debug("开始");
                TimeUnit.SECONDS.sleep(1);
                log.debug("结束");
                r = 10;
            } catch (InterruptedException e) {
                e.printStackTrace();
            }

        }, "t1");
        t1.start();
        t1.join();
        log.debug("结果为:{}", r);
        log.debug("结束");
    }
}
2
3
4
5
6
7
8
9
10
11
12
13
14
15
16
17
18
19
20
21
22
23
24
25
26
27
28
# 等待多个结果
问,下面代码(伪代码) cost 大约多少秒?
static int r1 = 0;
static int r2 = 0;
public static void main(String[] args) throws InterruptedException {
    test2();
}

private static void test2() throws InterruptedException {
    Thread t1 = new Thread(() -> {
        sleep(1);
        r1 = 10;
    });
    Thread t2 = new Thread(() -> {
        sleep(2);
        r2 = 20;
    });
    long start = System.currentTimeMillis();
    t1.start();
    t2.start();
    t1.join();
    t2.join();
    long end = System.currentTimeMillis();
    log.debug("r1: {} r2: {} cost: {}", r1, r2, end - start);
}
2
3
4
5
6
7
8
9
10
11
12
13
14
15
16
17
18
19
20
21
22
23
分析如下
第一个 join:等待 t1 时,t2 并没有停止,正在运行
第二个 join:1s 后,执行到此,t2 也运行了 1s,因此也只需再等待 1s。即总共 cost 2秒
如果颠倒两个 join 呢?一样!因为t2 join完毕后,t1在此2s内已经执行完了
# 常用方法—interrupt 🔥
# interrupt—中断线程 🔥
请求终止线程,仅设置了一个标志位,中断一个不在活动状态(阻塞)的线程没意义并会抛异常
- 如果被打断的线程正在 sleep,join,wait 会导致被打断的线程抛出 InterruptedException,并清除打断标记(置为false)
- 如果打断的正在运行的线程,则会设置打断标记(置为true) ;
- park 的线程被打断,也会设置打断标记(置为true)
# 普通方法 isInterrupted—线程是否被中断 🔥
不会清除中断标志位
# 静态方法 interrupted—线程是否被中断
会清除中断标志位!!!
# 打断线程正在 sleep,join,wait 的线程—没意义
@Slf4j(topic = "testInterrupt1")
public class TestInterrupt1 {
    public static void main(String[] args) throws InterruptedException {
        test1();
    }

    private static void test1() throws InterruptedException {
        Runnable task1 = () -> {
            try {
                log.debug("sleep...");
                TimeUnit.SECONDS.sleep(5);
            } catch (InterruptedException e) {
                e.printStackTrace();
            }
        };

        Thread t1 = new Thread(task1, "t1");
        t1.start();

        TimeUnit.SECONDS.sleep(1);//
        log.debug("interrupt...");
        t1.interrupt();
        TimeUnit.MILLISECONDS.sleep(50);// 打印前必须再等待下,因为中断标记清除比较慢!
        log.debug("中断标记:{}", t1.isInterrupted());// false
    }
}
2
3
4
5
6
7
8
9
10
11
12
13
14
15
16
17
18
19
20
21
22
23
24
25
26
# 打断正在运行的线程—正常
@Slf4j(topic = "testInterrupt1")
public class TestInterrupt1 {
    public static void main(String[] args) throws InterruptedException {
        test2();
    }

    private static void test2() throws InterruptedException {
        Runnable task1 = () -> {
            log.debug("running...");
            // 这里要是改为 sleep ,则中断标记将被置为 false
            while (true) {
                // 必须手动退出,否则一直执行。可以用于优雅停止!
                boolean flag = Thread.currentThread().isInterrupted();
                if (flag){
                    log.debug("被打断了,我主动退出");
                    break;
                }
            }
        };

        Thread t1 = new Thread(task1, "t1");
        t1.start();

        TimeUnit.SECONDS.sleep(1);// main 线程睡1秒,防止t1线程还未执行
        log.debug("interrupt...");
        t1.interrupt();
        TimeUnit.MILLISECONDS.sleep(50);// 打印前必须再等待下,因为中断标记清除比较慢!
        log.debug("中断标记:{}", t1.isInterrupted());// true
    }
}
2
3
4
5
6
7
8
9
10
11
12
13
14
15
16
17
18
19
20
21
22
23
24
25
26
27
28
29
30
# 打断 park 线程—正常
@Slf4j(topic = "testInterrupt1")
public class TestInterrupt1 {
    public static void main(String[] args) throws InterruptedException {
        test3();
    }

    private static void test3() throws InterruptedException {
        Thread t1 = new Thread(() -> {
            log.debug("park...");
            LockSupport.park();// 该方法后面的代码不会执行,除非打断标记为true
            log.debug("unpark...");
            log.debug("打断状态:{}", Thread.currentThread().isInterrupted());// 不清除中断标记
            // log.debug("打断状态:{}", Thread.interrupted());// 清除中断标记为false
            // 再次执行无效(后面的代码会继续执行),因为打断标记已经为true,除非修改打断标记为false,如使用interrupted静态方法
            LockSupport.park();
            log.debug("unpark...");
        }, "t1");
        t1.start();
        TimeUnit.SECONDS.sleep(3);
        t1.interrupt();
    }
}
2
3
4
5
6
7
8
9
10
11
12
13
14
15
16
17
18
19
20
21
22
# 设计模式—两阶段终止 🔥
见设计模式
# 过时方法
还有一些不推荐使用的方法,这些方法已过时,容易破坏同步代码块,造成线程死锁
stop():停止线程运行,@Deprecated(since="1.2")suspend():挂起(暂停)线程运行。wait、notify代替resume():恢复线程运行。wait、notify代替
# 应用—统筹分析 🔥
见应用章节
# OS 中查看线程进程的方式
# Windows
任务管理器可以查看进程和线程数,也可以用来杀死进程
tasklist查看进程tasklist | findstr javataskkill杀死进程
# Linux
ps -ef查看所有进程ps -fT -p <PID>查看某个进程(PID)的所有线程kill杀死进程top按大写 H 切换是否显示线程top -H -p <PID>查看某个进程(PID)的所有线程?
# Java
jps命令查看所有 Java 进程jps | grep Testjstack <PID>查看某个 Java 进程(PID)某一刻的所有线程状态(快照)jconsole来查看某个 Java 进程中线程的运行情况(图形界面)需要以如下方式运行你的 java 类
java -Djava.rmi.server.hostname=`ip地址` -Dcom.sun.management.jmxremote -Dcom.sun.management.jmxremote.port=`连接端口` -Dcom.sun.management.jmxremote.ssl=是否安全连接 -Dcom.sun.management.jmxremote.authenticate=是否认证 java类1修改 /etc/hosts 文件将 127.0.0.1 映射至主机名
如果要认证访问,还需要做如下步骤
- 复制 jmxremote.password 文件
- 修改 jmxremote.password 和 jmxremote.access 文件的权限为 600 即文件所有者可读写
- 连接时填入 controlRole(用户名),R&D(密码)
# JMH 基准测试
- 基准测试工具选择,使用了比较靠谱的 JMH,它会执行程序预热,执行多次测试并平均
- cpu 核数限制,有两种思路
- 使用虚拟机,分配合适的核
- 使用 msconfifig,分配合适的核,需要重启比较麻烦
- 并行计算方式的选择
- 最初想直接使用 parallel stream,后来发现它有自己的问题
- 改为了自己手动控制 thread,实现简单的并行计算
使用 archetype 创建 Maven 项目
mvn archetype:generate -DinteractiveMode=false -DarchetypeGroupId=org.openjdk.jmh -DarchetypeArtifactId=jmh-java-benchmark-archetype -DgroupId=org.sample -DartifactId=test -Dversion=1.0
进入该 test 项目,修改测试代码
@Fork(1)
@BenchmarkMode(Mode.AverageTime)
@Warmup(iterations=3)
@Measurement(iterations=5)
public class MyBenchmark {

    static int[] ARRAY = new int[1000_000_00];
    static {
        Arrays.fill(ARRAY, 1);
    }


    @Benchmark
    public int c() throws Exception{
        int[] array = ARRAY;
        FutureTask<Integer> t1 = new FutureTask<>(()->{
            int sum = 0;
            for(int i = 0; i < 250_000_00;i++) {
                sum += array[i];
            }
            return sum;
        });
        FutureTask<Integer> t2 = new FutureTask<>(()->{
            int sum = 0;
            for(int i = 0; i < 250_000_00;i++) {
                sum += array[250_000_00+i];
            }
            return sum;
        });
        FutureTask<Integer> t3 = new FutureTask<>(()->{
            int sum = 0;
            for(int i = 0; i < 250_000_00;i++) {
                sum += array[500_000_00+i];
            }
            return sum;
        });
        FutureTask<Integer> t4 = new FutureTask<>(()->{
            int sum = 0;
            for(int i = 0; i < 250_000_00;i++) {
                sum += array[750_000_00+i];
            }
            return sum;
        });
        new Thread(t1).start();
        new Thread(t2).start();
        new Thread(t3).start();
        new Thread(t4).start();
        return t1.get() + t2.get() + t3.get()+ t4.get();
    }


    @Benchmark
    public int d() throws Exception {
        int[] array = ARRAY;
        FutureTask<Integer> t1 = new FutureTask<>(()->{
            int sum = 0;
            for(int i = 0; i < 1000_000_00;i++) {
                sum += array[i];
            }
            return sum;
        });
        new Thread(t1).start();
        return t1.get();
    }
}
2
3
4
5
6
7
8
9
10
11
12
13
14
15
16
17
18
19
20
21
22
23
24
25
26
27
28
29
30
31
32
33
34
35
36
37
38
39
40
41
42
43
44
45
46
47
48
49
50
51
52
53
54
55
56
57
58
59
60
61
62
63
64
65
打包后在 test 目录下执行 java -jar [-Xmx2G] target/benchmarks.jar 测试:
- 可以看到多核下,效率提升还是很明显的
- 单核下,性能几乎是一样的,甚至多线程代码还慢了一点